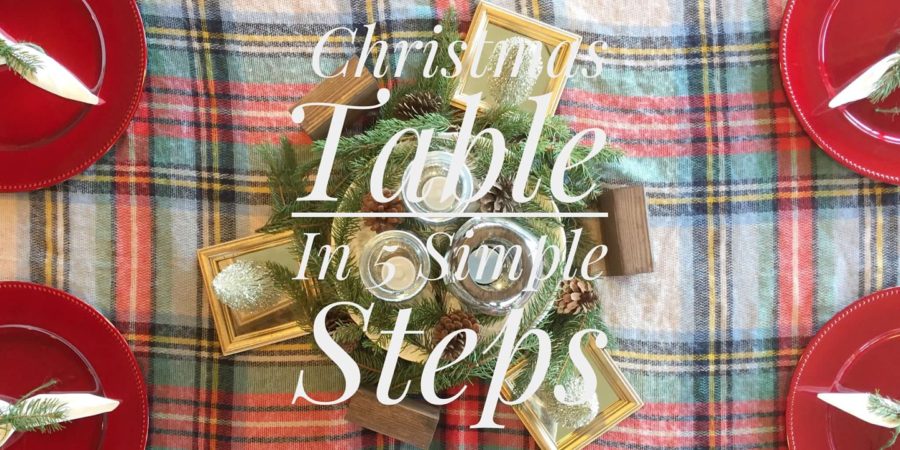
I had the honor of decorating a table last week for a dinner that our fantastic Ladies Ministry team arranged. I knew right away this was something I wanted to do, but I put off planning for it until the week of the event. I wouldn’t say I was procrastinating, rather waiting for some inspiration (ummm, isn’t that what procrastinating is?) Anyway, early in the week I noticed a fella throwing away some evergreen trimmings. Ok, he was SHOVING it into his garbage can so the city would actually pick it up. These lovely, HUGE branches were being tossed, and I HAD to do something about it. So I politely asked if I could take some off of his hands, and he happily obliged. To be honest, my mother had taken some off the curb earlier in the week and she told me to look there to begin with. Thanks, Mom! Well, once I had the greenery, it hit me. RUSTIC! So, that’s the theme I went with for that night. I must say, it turned out really sweet. However, the steps I am about to give you are good for ANY theme be it rustic, winter wonderland, snowman, or however you are inspired! So here are 5 simple steps to get you the perfect Christmas (or any) centerpiece and tablescape.
Step 1: Tablecloth

I used to not use these. I thought they were a waste of money and they never went with my decor. Perhaps it was because I hadn’t been introduced to TJ Maxx yet? I have since come to appreciate how a tablecloth can (1) protect your table and (2) provide a lovely accent to your centerpiece. For my rustic look, I began with a red tablecloth fitted for the table, and added a plaid blanket scarf over it. The layered look is really nice.
Step 2: Centerpiece
This is the piece which will hold all or most of the other elements in your piece. This can be a tray, cake stand (as shown here), tiered tray, box, or bowl. Put it right in the middle of the table. Make sure it isn’t so big that you can’t fit the place settings or so small that the size of the table overwhelms it. Mine was about a foot and a half wide for a table that seated 8 and it was aaaalmost too small. In hindsight, I should’ve used my bigger cake stand. Lesson learned…
Step 3: Height-Varied Fill Ins
These are the items that you will put on and around your tray or stand, or in your bowl or box. The heights of these object should vary. It’s best to add things in odd numbers. As you see here, I have 3 mercury glass candle holders on the stand, 3 mirrors with trees, and 3 decor blocks. They are all different heights, coordinating in color and texture. When choosing the height, I try to remember that people will probably want to see each other, so I keep the height fairly short and not so cumbersome.
Step 4: Greenery or Floral
Let’s come back to that abundance of free greenery, shall we? I placed this in between the candles, around the base of the cake stand, and every where in between. I stood back and looked. If it seemed sparse, I added some more. I did this from every angle until it looked completely filled in. If I ever looked and thought it was missing something, it probably was. For floral, it means adding it to vases or jars that you placed from step 3. This is also when you would add sprigs or sprays of other natural materials (baby’s breath, floral stems, greenery stems, berry stems, feathers, or in my case, pinecones.
Step 5: Place Settings
For this particular event, the napkins and silverware were being provided, so I didn’t add that to my table, but now is when you would do that for an event at your home. I placed chargers at each place setting and added an additional napkin tied with colored twine and a sprig of the greenery. Who doesn’t need an extra napkin? Otherwise, I would’ve added a dinner plate, napkin, salad plate, bread plate, glass, and cutlery at each place setting.
Well there you have it! Many of these things are items that I already had. In this case, I only spent $9 on the mini trees (dollar spot at Target) and mercury glass votives (small ones were $1 ea at the Dollar Tree, and the larger one was $4 at TJ Maxx). Not bad for how cute it turned out! Before you head out to purchase all these items, look in your own personal stash at home. Chances are you have most of these elements already. Happy Decorating!
If you liked this post, you will LOVE these!
Our DIY Christmas Front Porch Décor
This holiday, give the gift of Beautycounter


Looks great jen!
Thank you, Rachel!