[wpforms id=”394″ title=”true”]
Have I mentioned to you that I love inexpensive, one-of-a-kind art? Many people believe that those aren’t really words that go together, but that’s why I love old frames. Sometimes they tell a story. Sometimes, they are just a cry for help! Either way they make for GREAT, unique, inexpensive art. I never pass up an opportunity to scour through old frames at thrift stores, antique malls, or flea markets. And if I look hard enough, not only will I find a great frame, I can find a really good deal! I have done so many things with old frames, I thought I would share 5 SIMPLE ways to transform an old frame with you so that you can do something with all of those old frames in your storage space!
What To Look for in an Old Frame
First, I look for wooden frames, the chunkier the better. Wood is easier to paint and drill into (and that’s important for these transformations!)
Second, I make sure that the frame is sturdy. Even though it’s inexpensive, I really don’t want to have to fix it first! There are plenty of frames that need love that are sturdy enough. Those frames that are custom (you can tell because they are backed with paper or cardboard and usually have some type of marking/barcode/receipt on the back, fastened by staples) are usually the best quality and most durable. Granted, they usually take a little more time and care in removing the print, but it’s worth it!
Third, I look at the size of the frame. For me, the bigger, the better. I DO like the look of layering or grouping frames, so keep that in mind when you are on the hunt. On the other hand, there are plenty of things you can do with a smaller frame. It all depends on your project.
Finally, I look for frames that have fun details. More than likely you are taking the print out of it, so the frame IS the focal piece. Make sure it’s worth looking at!
5 Ways to Transform an Old Frame
1. Paint it/Hang it/Group it

When frames vary in size, they look great in groups of odd numbers. Pair them with other frames, word art, or even old windows like I did here. There were too many wood tones for my liking, so I painted one to stand out a little bit. Otherwise, you can leave them as is, or paint them to your own liking.
2. Create a chalkboard

I can’t tell you how EASY this one is! If you like the frame as is, just remove the glass, spray it (or roll it) with a chalkboard (not chalk) paint, replace it, and voila! If you aren’t crazy about the color of the frame, paint it while the chalkboard paint is drying. Spray paint is the best, since it gets into all the nooks and crannies. That is a project, easily done under $20! If you bought a custom frame. it might be easier to tape the glass off than to remove it since it is difficult to replace the staples that hold the cardboard in!
3. Hang a wreath or letter in it

I have put both letters and wreaths in frames, and I can’t even tell you which I like the best. The answer would be BOTH! If you don’t want to hang anything from it, you can at least hang it on the wall inside the frame. Either creates quite a statement piece. Or you could think outside of the box and hang something else entirely within the frame (a big bow? a mini sign? a bust? hanging plant?). The possibilities are endless!
4. Create an art or picture display

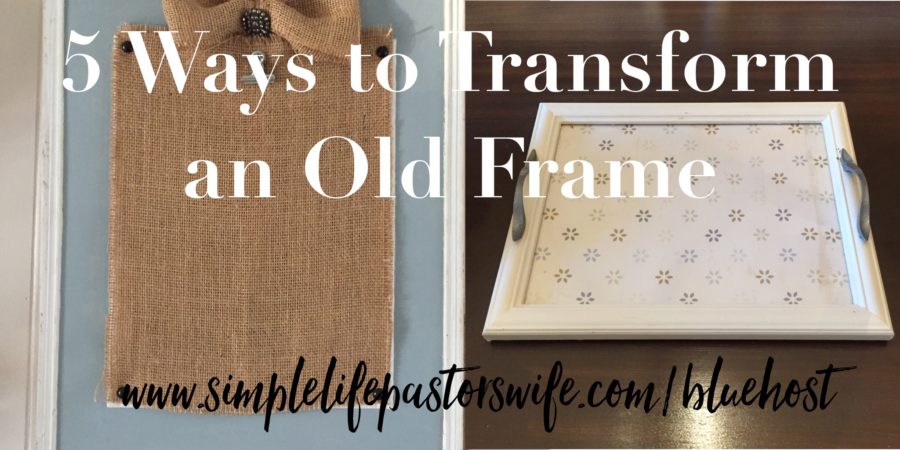
This one takes a little more effort and materials, but it’s SOO cute and still pretty inexpensive! Put a little burlap under the glass and glue a clip on the front of the glass, and you have a little art display. Maybe add a burlap bow, like the one shown above! I have actually put pictures up this way as well which gives a little twist to the traditional picture frame. For this particular frame, I added some brads to give it extra appeal, and there was no glass, so I just secured the burlap with the brads.
5. Turn it into a tray

This option takes the frame off of the wall entirely. Make sure the frame is chunky enough to drill holes into and add two handles on each side. Paint it, and put some scrapbook paper or even fabric under the glass. Be sure to fasten it underneath if the glass isn’t very supported and add some felt pads if it is going on a table of some sort. More than likely, the screws from the handles will scratch the surface. Not. Good. As you can see, I put some tape on the screws to keep them from scratching the surface. You could even interchange the paper or fabric as the seasons change!
Well, there you have it. 5 SIMPLE ways to transform an old frame. There is life to an old frame! Now go get yours and CREATE!!
If you liked this post, you might also be interested in these!
[wpforms id=”394″ title=”true” description=”true”
This holiday, give the gift of Beautycounter