[wpforms id=”394″ title=”true”]
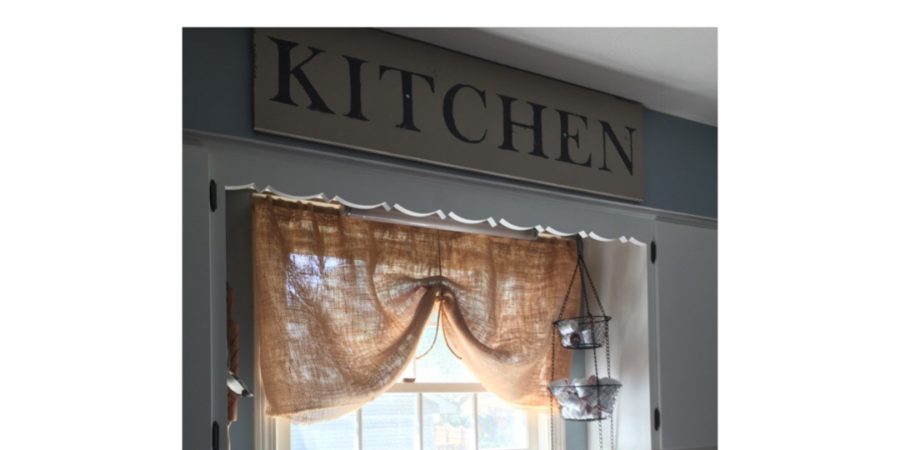
I love my kitchen. Ok, I like my kitchen. But the reality is that is where I spend much of my time, so I should love my kitchen, am I right? I peruse many other “farmhouse” kitchens and marvel at their beauty. I try not to play the “if only I had” game, but sometimes that little monster creeps in. However, it’s nice when I can match it with a “hah I can do that with materials I have right here in my garage!” That’s exactly what happened for the inspiration of this post. It was late at night, and my husband (student pastor) was out at an all-nighter. I don’t sleep well when he’s gone, so I took that as an opportunity to get creative since the kids were already in bed. I have seen so. many. antique. signs in kitchens, and me likey! Sooo I decided to create one myself using materials I already had (after all, it was late, and the kids were in bed, so what’s a girl to do?). We have a house built in the mid-ish 1900s. All of the closets were designed with double wide shelves on top. That translates to things being lost in the back and space being wasted, SO I removed half of all of the shelving in every closet. Much of that was repurposed into other shelves (mostly lower, so my barely 5′ self can reach them), but there were a few that landed in the garage. Fast forward four years to this project, and I’m glad I hoard unused, but usable wood since one of those said shelves became the wood (and main material) for this DIY antique sign project!
Materials:
Wood in your preferred size (scrap if you have it). Mine is approximately 12″ x 41″
Paint for the base and letters (I used chalk paint for the letters since it creates more of a distressed look without much effort)
Cardstock (I used 100 weight)
Printer
Straight blade or box cutter
Scrap cardboard
Painters tape
Sand paper or sanding block
That’s it! I didn’t even use tools except to hang it. The piece of wood I found was already the right size AND it was painted a color I could live with (pale grey) so I lucked out!
Instructions:
Get your wood and paint the base color you desire, if it isn’t already painted. Mine was already a color I could live with, so I left it. If I were going to put it up on the wall, like I did, I wouldn’t bother painting all sides, but you certainly can if you want!
While the paint is drying, find a font for your sign. I used Baskerville Old Face on Microsoft. Choose the font size that will fit your piece of wood. There is a view setting where you can see the size of the letters. Use that as a guide. I used font size 350 since I wanted it rather large. Print it out on cardstock. You will be cutting these letters out, so make sure your weight is heavy enough that it doesn’t rip. To save on ink, I made an outline of the letters, and then made the font white so only the outline showed up.
Use a straight blade or box cutter to cut out the letters. I plan on using the inside for other projects, so I tried to be precise, so as not to ruin either pieces of the letter. **IMPORTANT** Your blade WILL go through, so I recommend cutting on a scrap piece of cardboard so you won’t ruin any surface. I guess you could cut this while sitting in your garage, but OUCH!
Once the letters are printed and cut, the paint should be dry. Line up the letters so that they are spaced evenly on the piece of wood. Then tape it off using painters tape. I taped the letters together AND to the wood.

Using a dry brush, gently tap the paint (not too much at a time, or it will bleed) on the stencil. Don’t worry if it bleeds a little, you will be sanding this anyway. I used chalk paint so scratching it off where it bled too much wasn’t a problem at all!
BEFORE the paint dries, remove the stencils CAREFULLY. This may look a little messy, AND THAT’S OK! This project isn’t meant to look perfect. If you want it to look perfect, I can recommend a few places that make BEAUTIFUL signs.

Let the paint dry the rest of the way. If you sand now, it will ruin the paint. Not. Good.
Once the paint is completely dry, use a small piece of sandpaper or sanding block to rub LIGHTLY over the letters. This will create a worn look, and will drown out any “messes” that occurred while painting. Mine was FAR from perfect, but I am completely satisfied with the way it turned out.

You’re done! Hang it up and enjoy your handiwork!


How simple was that? If you like simple, one day DIY projects, make sure to check out the rest of the DIY projects here. Simplicity is the name of my game. Especially with two kids!!
If you liked this project, here are some other posts you might enjoy!
How to Age Galvanized Metal (the “natural” way)
[wpforms id=”394″ title=”true” description=”true”
This holiday, give the gift of Beautycounter